As the core component in the field of industrial pipeline connections, tube fittings are widely utilized across demanding industries such as petrochemicals, power generation, food and beverage, and biopharmaceuticals. Their exceptional resistance to high pressure, excellent anti-corrosion properties, and unparalleled installation convenience make them indispensable. However, the installation quality directly dictates the sealing integrity and operational stability of the entire system. A seemingly minor operational error can precipitate catastrophic leaks, severe system vibrations, or irreversible equipment damage. Based on extensive industry practices and authoritative technical manuals, this comprehensive article systematically breaks down the standardized installation process of tube fittings. By integrating critical parameters, tool selection criteria, and fault prevention measures, we provide engineers and technicians with a highly actionable, in-depth operational guide.
I. Pre-installation Preparation: Laying the Foundation for Success
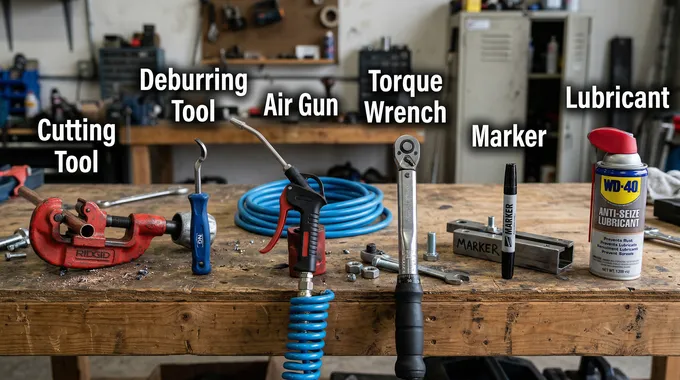
The success of a leak-free system begins long before the wrench meets the nut. Thorough preparation is non-negotiable. Essential tools include a professional tube cutter, deburring tools, a high-pressure air gun, a precisely calibrated torque wrench (accuracy ±5%), a marking pen, and appropriate lubricants. Crucially, materials must strictly align with design specifications. Seamless steel tubes must match the ferrule material seamlessly. For exact tube pre-treatment, employ a dedicated tube cutter to ensure the end face squareness remains ≤0.5°. Use a high-quality deburring tool to eliminate both internal and external burrs. Finally, ensure the ambient installation temperature falls between -20°C and 60°C.
II. Pre-assembly of Components: Precision Positioning is Key
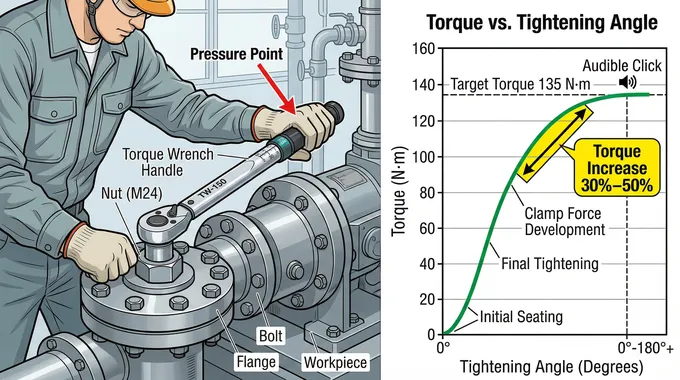
Methodically slide the nut, back ferrule, and front ferrule onto the tube end in precise order. For twin-ferrule fittings, pay meticulous attention that the back ferrule sits flush against the nut. Insert the tube deeply into the fitting body until it firmly bottoms out against the shoulder. Use a marker to draw a line on the tube's exterior aligned with the fitting body's end face. Manually rotate the nut until it can no longer be turned by hand. At this juncture, the ferrule is in its initial positioning state.
IV. Installation Quality Verification: Multi-dimensional Inspection
The front ferrule's cutting edge must imbed uniformly into the tube wall, creating a continuous bite ring 0.02-0.05mm deep. The rear of the back ferrule should flawlessly mate with the conical surface of the fitting body. Rigorous functional testing is essential. Pressurize the system to 1.5 times the design pressure and hold for 30 minutes to confirm absolute zero leakage. For pipelines connected to rotating machinery, subject the joint to simulated vibrations to validate anti-loosening resilience. Perform 3 cold-hot cycles between -20°C and 150°C to verify that sealing performance does not degrade under thermal stress.
Issue | Cause | Solution |
Leakage | Ferrule failed to bite into the tube. | Reinstall, ensuring accurate identification of the pressure point. |
Vibration Loosening | Insufficient tightening. | Add an additional 1/8 turn and apply industrial thread-locking fluid. |
Tube Wall Sheared | Extreme over-tightening or excessively soft tubing. | Swap to appropriate tubing and strictly monitor tightening angles. |
Installation Resistance | Mismatch between ferrule and tube tolerances. | Reselect components ensuring proper H8/f7 tolerance fits. |
V. Reassembly Guidelines & Optimization
Safely release all system pressure to 0 MPa via dedicated bleed valves and wait 10 minutes to ensure total equilibrium. 316L stainless steel ferrules can generally endure 5-8 reassembly cycles, whereas softer brass ferrules are strictly limited to 2-3 cycles. The future of tube fitting installation is undeniably digital. Smart torque wrenches with Bluetooth capabilities now plot real-time torque-angle curves, autonomously detecting the exact pressure point. Engineers are leveraging ANSYS 3D simulations to model ferrule stress states and optimize tightening strategies before stepping onto the field.
The installation of tube fittings is the ultimate testament to the engineering adage: "Details determine success." From the microscopic precision of tube pre-treatment to the rigorous multi-dimensional verification, every single step must adhere to strict technical specifications. By standardizing workflows, executing precise control, and embracing digital tools, engineers can drastically elevate installation quality and system reliability. Continuous learning and adherence to evolving manufacturer protocols are the true shields guarding the safe operation of modern industry.


